MTB Saddle Height Calculator
Start with a road-style inseam formula, then trim it for mountain bike body movement, crank length, shoe and pedal stack, rear sag, riding style, and the kind of trail you actually ride.
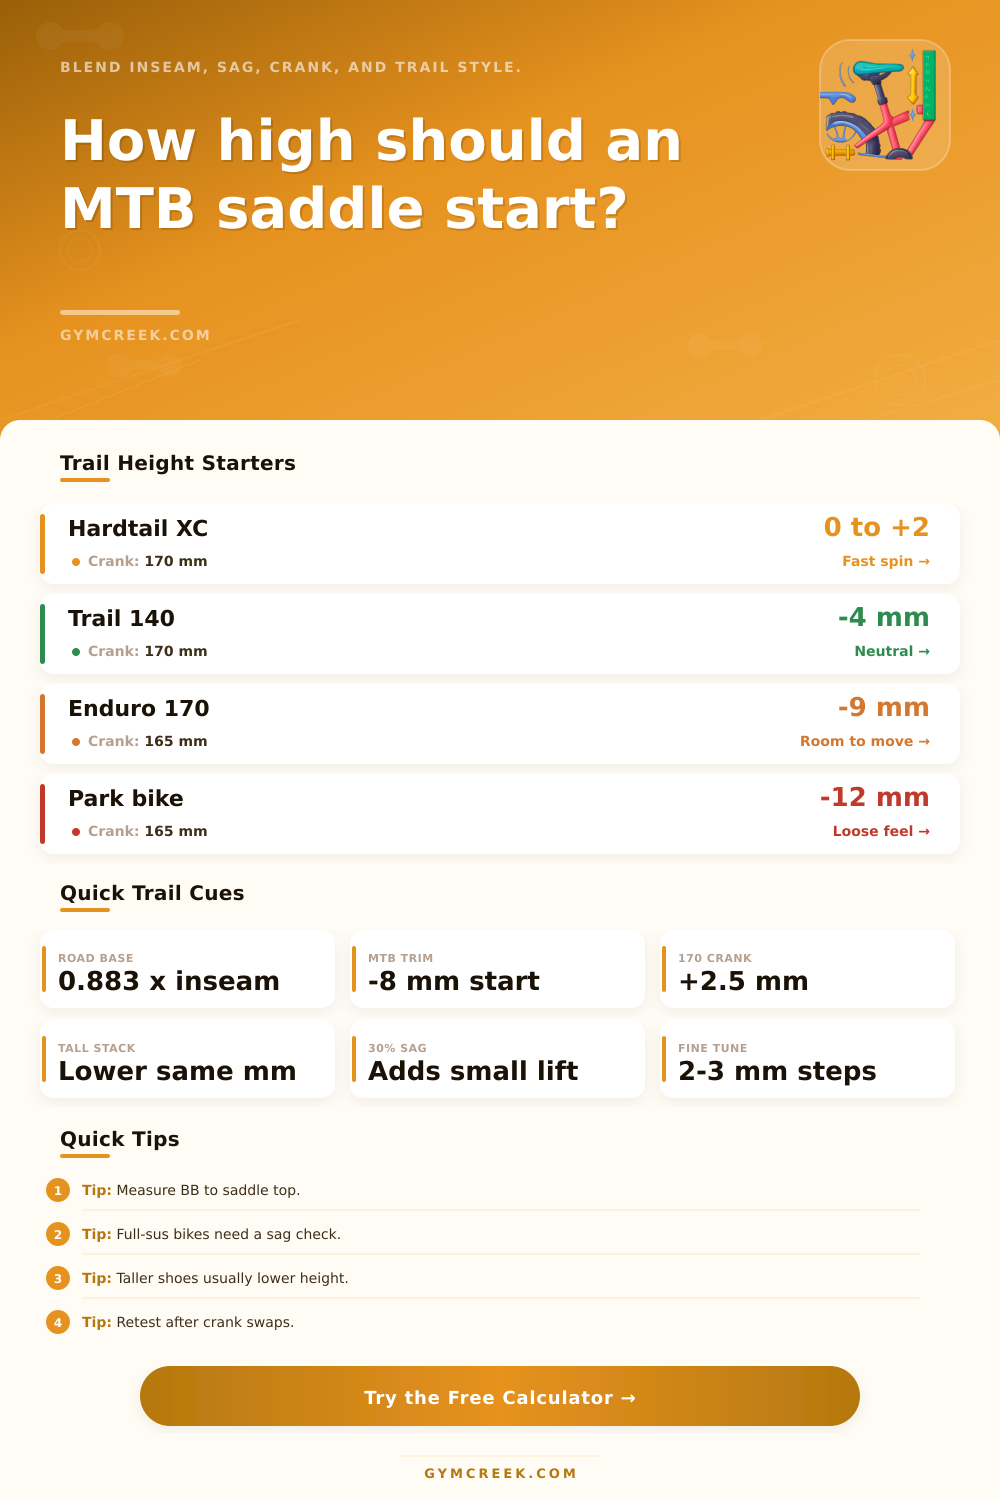
📍Trail Presets
These presets cover hardtails, short-travel trail bikes, full-suspension climbers, enduro rigs, park bikes, and a taller eMTB case so the numbers feel grounded in real MTB fit use.
⚙Fit Inputs
MTB saddle-height target
Enter rider and bike details to estimate a practical mountain bike saddle height.
📊Trail Metrics Grid
📑Reference Tables
| Style | Bias | Why | Typical feel |
|---|---|---|---|
| Seated XC spinner | +2 mm | More steady seated power | Taller and efficient |
| Balanced trail stance | 0 mm | Neutral mix of pedaling and movement | Middle ground |
| Traction-first climber | -1 mm | Loose climbs reward a calmer pelvis | Subtle trim |
| Pump, manual, and move | -4 mm | Active body English needs more room | Playful and low |
| Descend-first body mover | -6 mm | Steep terrain punishes tall saddles | Lots of clearance |
| Terrain | Bias | Window | Main reason |
|---|---|---|---|
| Smooth XC loops | +2 mm | +/- 2 mm | Closer to a seated efficiency fit |
| Mixed singletrack | 0 mm | +/- 3 mm | Neutral trail compromise |
| Loose and rooty trail | -3 mm | +/- 4 mm | More room for timing mistakes |
| Steep technical enduro | -6 mm | +/- 5 mm | Body movement outranks pure extension |
| Bike park and jump lines | -8 mm | +/- 5 mm | Repeated compressions favor lower starts |
| Long backcountry days | -2 mm | +/- 4 mm | Fatigue asks for comfort room |
| Rear travel | Sag | Dyn drop | Static add |
|---|---|---|---|
| 0 mm | 0% | 0 mm | 0 mm |
| 120 mm | 25% | 3.6 mm | 1.8 mm |
| 140 mm | 28% | 4.7 mm | 2.4 mm |
| 160 mm | 30% | 5.8 mm | 2.9 mm |
| 180 mm | 32% | 6.9 mm | 3.5 mm |
| Change | Bias | Reason | Reminder |
|---|---|---|---|
| 165 vs 172.5 | +7.5 mm | Less knee rise at top dead center | Raise a little |
| 170 vs 172.5 | +2.5 mm | Small relief through the top | Near neutral |
| 175 vs 172.5 | -2.5 mm | More knee rise needs less height | Lower a touch |
| Taller stack | -same mm | Foot sits closer to the saddle | Lower equally |
| Shorter stack | +same mm | Foot sits farther away | Raise equally |
💡Trail Tips
Saddle height is anothers important factor to consider when mountain biking. Saddle height impact the way that a person move on their bicycle. If the height of the saddle is too high for the individual, they may experience issues with their hips when riding over roots or steep downhill terrain.
However, if the cyclist sets the height of the saddle to the correct height, the bicycle will feel as though it is an extension of the rider’s leg. Saddle height for mountain biking is slightly different than saddle height for road biking. Road biking typically requires the cyclist to transfer the power to the bicycle as efficient as possible, which requires the cyclist to keep their ankles locked in the same position while cycling.
How to set the right saddle height for mountain biking
However, mountain biking require the biker to be able to move their body to absorb the impact from the terrain and shift their weight when riding on trails. An inseam formula can be used to find the starting point for saddle height. To calculate the inseam formula for saddle height, calculate 88% of the length of the person’s leg from the floor to there crotch.
This formula take into account the person’s leg length, which is a required component to determining the height of the saddle. However, the rider will have to lower the height of the saddle for mountain biking. This adjustment for mountain biking accounts for the need for the cyclist to have a higher degree of flexibility in their movement while riding, as well as for the impact of terrain on the body.
The length of the cranks that are used on the bicycle can also impact the saddle height. If the cyclist shortens the length of the crank to, say, 170mm from the center of the axle to the center of the pedal spindle, the rise of the knee will be lower while the bike is in motion. Therefore, using shorter cranks will allow the person to set the height of the saddle higher.
Cranks that are longer than 170mm will require the person to lower the saddle height to ensure that the cycling movement of the cyclist is smooth. The thickness of the shoes that are used while cycling will also impact saddle height. If an individual sets the height of their saddle without considering the thickness of the sole of their shoes, the height that they set will change as a result of the thickness of their shoes.
Therefore, they will need to take this into consideration when setting the height of the saddle. For bikes that have suspension in the rear end of the bike, the saddle height will drop when the cyclist is sitting on the bike; this drop is referred to as suspension sag. When this drop occurs, the height of the saddle will feel lower on the trails than it will in the garage.
Bikes that do not have suspension in the rear end of the bike, such as hardtails, will not have this drop in the height of the saddle. The riding style of the cyclist will also play a major role in the ideal height of the saddle for that cyclist. Bikers that focus on cross country biking may require a different saddle height than those that focus on trail biking.
The terrain that the cyclist desires to ride will play a role in the height of the saddle. For instance, individuals that wish to ride on smooth trails may require a saddle height that is similar to those required for road biking. However, those that wish to ride on terrain that may be steep or technical may require the height of the saddle to be lower to provide the necessary clearance for the cyclist to ride without the saddle from the bicycle from contacting their body on the trails.
Additionally, myths regarding heel drop and the angle of the knees when cycling should be avoided. These myths may have originated from road biking requirements, but will not be of any assistance to those mountain biking. Instead, the cyclist should ride on the trails to test the height of the saddle.
By determining the ideal height for the cyclist’s saddle, they can ride on a familiar trail to test the height. If the cyclist feels as if their hips are rocking excessively on steep hills or if their knees are binding when unclipping from the pedals, then the height of the saddle should be adjusted. The height of the saddle should be adjusted in increments of two millimeter.
Therefore, the cyclist should not adjust the height of the saddle by six millimeters or more at one time. There are various reason that the height of the saddle may become incorrect over time. For instance, if the cyclist changes to shoes that are thicker in their sole, the height of the saddle will change.
If the cyclist changes the length of the cranks that are utilized on the bike, the height of the saddle will have to be retested. If the sagging suspension on the bike increases as a result of the loosening of the suspension components, the height of the saddle will appear to lower. Finally, if the rider moves the saddle forward or backward on the bicycle frame, the length that the legs extend will change.
Testing the height of the saddle on the trails will be more effective for the cyclist than any mathematical equation regarding saddle height. For instance, the cyclist can set the height of the saddle to the target height in their garage. When they have set the height of the saddle to the target height, they can clip into the pedals and ride on flat ground.
Afterwards, they can ride up some hills to ensure that power is transferred to the bicycle cleanly and that their hips do not rock excessively. Finally, they can descend some hills to ensure that they are able to shift their stance quick, as well as that the saddle is not in the way of their riding movement. By following these steps, the cyclist will find the sweet spot for their saddle height where they can both generate power with their bicycle while allowing for their body to have the room to move as required when biking on the trails.